

Arts And Crafts Of Asia
Asian crafts are a wonderful fashion to discover the art and culture of other countries. These simple tutorials are inspired by the traditional crafts of Japan, China, Republic of indonesia, and more.Nosotros besides picked projects that utilise materials that are easy to observe, and steps that even kids or beginner crafters can follow. Our goal isn't to give you a crash on how to brand replicas of Asian artwork – which takes years to primary – but to innovate you to new techniques and styles.
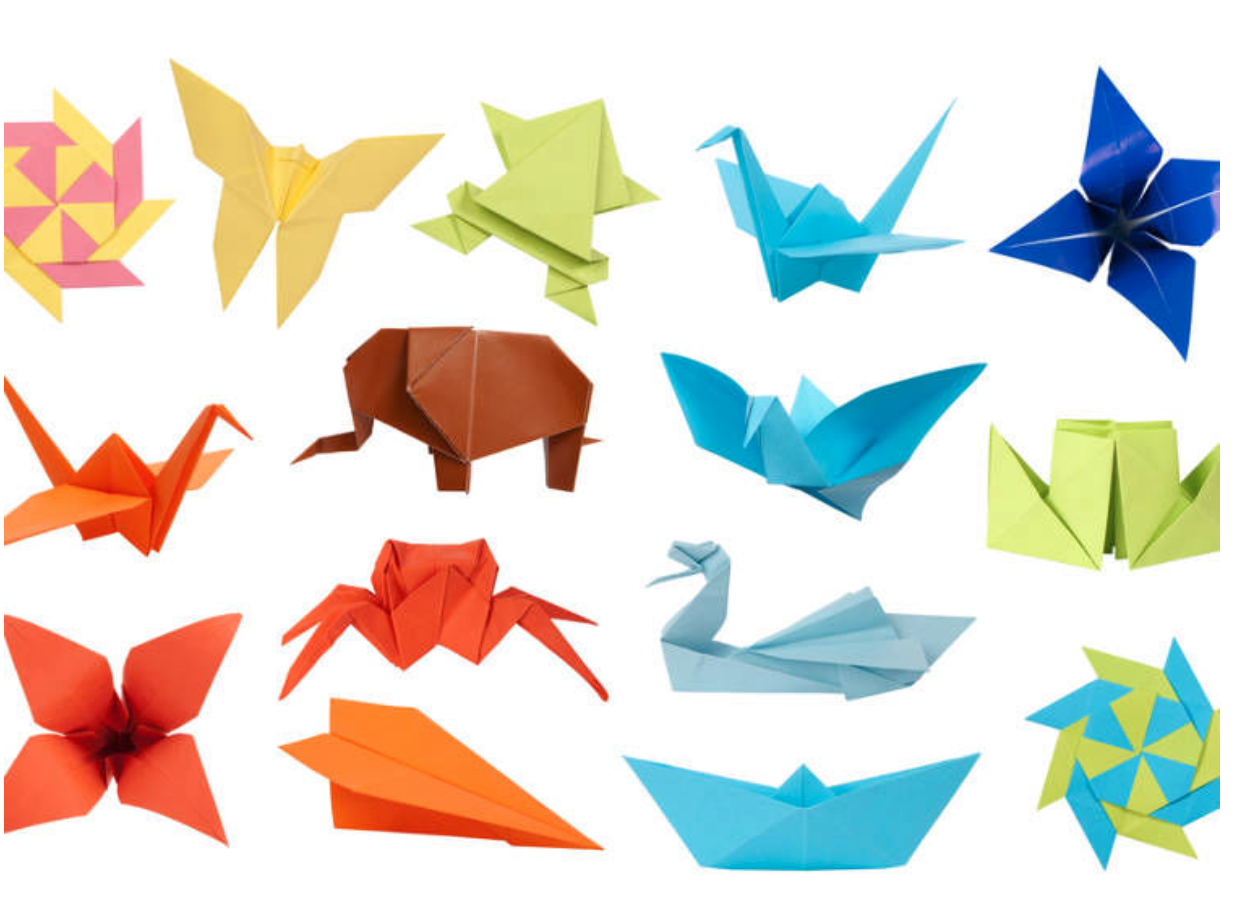
Japanese Origami
 Source: By Live Japan Perfect Guide, "Origami: The Art of Paper Folding" (https://livejapan.com/en/in-hokkaido/in-pref-hokkaido/in-sapporo_chitose/article-a0001052/)
Difficulty level: Easy
Japanese origami, or the art of newspaper folding, is one of the nigh pop Asian crafts. You probably have already tried it already, and made a newspaper plane, sailboat or envelope! But there are thousands of more origami patterns that you tin learn to do. For example, from animals to flowers, or more than practical objects similar processed holders or boxes that you lot tin can utilise for gift-wrapping. Origami is best learned past watching video tutorials, specially if you're using special origami newspaper that has patterns. Here are some channels you lot tin follow:
- Origami Aqueduct . The origami tutorials are perfect for beginners or even young kids! You tin find many patterns for cute animals to seasonal decorations for Halloween and Christmas.
- Origami with Jo Nakashima . Fix for a claiming? This popular origami channel has very unique patterns, from origami dragons to chess pieces!
- JeremyShaferOrigami . Jeremy'due south origami creations are fun and often draw from pop culture, such equally movies and video games. Make the Legend of Zelda sword, a newspaper Pokeball, or the Endgame Infinity gauntlet, and more than!
Kokeshi Dolls
 Source: By Detect Nikkei, "Simple Kokeshi Doll Tutorial" (http://www.discovernikkei.org/en/nikkeialbum/albums/388/?view=listing)
Difficulty level: Easy
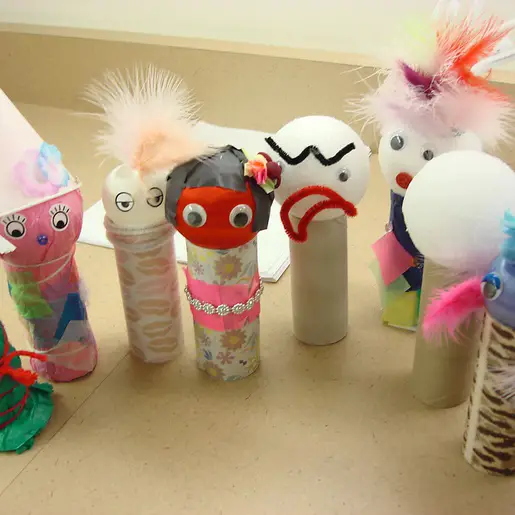
Kokeshi dolls are traditional Japanese wooden dolls. They don't commonly take arms or legs, but conscientious attention is placed on decorating their kimonos. Master craftsmen would often sign their piece of work at the bottom of the doll, and these masterpieces tin ofttimes fetch thousands of dollars! But you can make this Asian craft at home, using very affordable materials. In this simplified Asian arts and crafts tutorial, nosotros will use a cork or wooden ball, and materials you can notice at abode.
Materials
- Cork or wood ball or walnut for the head
- Bottle
- Paint
- Wooden chopsticks
- Craft mucilage
- Paints
- Paintbrush
Instructions
- Paint the head of the doll white and leave information technology to dry out.
- Paint the pilus, optics, and other desired details on the head.
- Cut chopsticks to the desired length and gum them to the back of the head.
- Paint the canteen the desired color of the dress.
- Decorate the "kimono" with hand-painted details, or use whatsoever materials you have at dwelling – stickers, washi tape, fabric scraps, origami paper.
- Glue the head of the doll to the decorated canteen.
Chinese Paper Lanterns
 Source: By First Palette, "Paper Lanterns" (https://www.firstpalette.com/craft/paper-lantern.html)
Difficulty level: Like shooting fish in a barrel
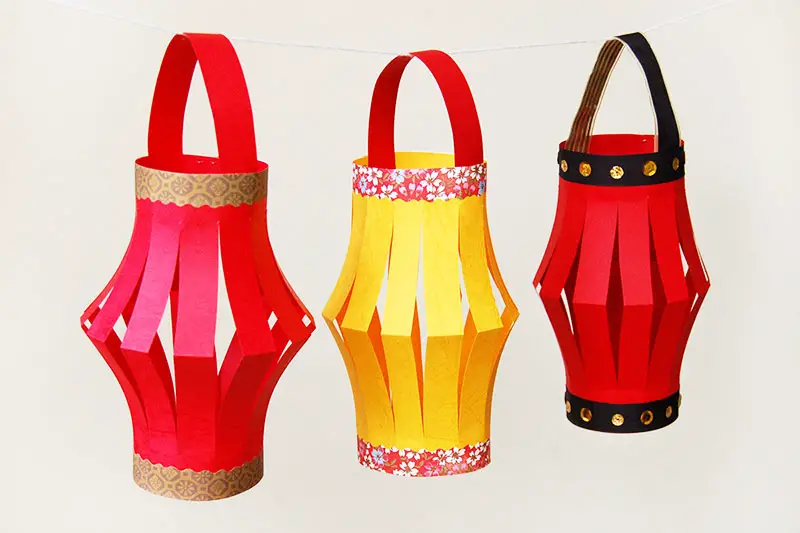
You've probably seen Chinese newspaper lanterns hung in your favorite Chinese eating place, or hung on the streets of Chinatown during the Lunar New year's day. Here is a simple version that anyone tin can make, and volition brand a lovely political party decoration.
Materials
- Cardstock (traditionally red, simply you can use any color you like), A4 size
- Crepe paper in the same color (or contrasting color) of the cardstock
- Scissors
- Heavy-duty tape or stapler
- Glue
- Ruler
- Pencil
- Decorations such as washi tape, ribbons, stickers, souvenir wrapping paper, sequins, etc.
- Optional: markers, glitter gum, puff paint, ModPodge
Instructions
- With your ruler, measure out 1 inch from the short side of the paper. Cut and set aside – you volition later use this to make the handle.
- Fold the remaining paper into ane one-half, lengthwise.
- Measure 1 inch and depict a line. This will serve as your cut guide and will mark the top and bottom borders of your lantern.
- Cut slits into the newspaper, virtually 1 inch apart, stopping at the border of the line you just drew.
- Unfold the paper. Decorate the uncut edges or borders with washi tape, stickers, or whatever decorative materials you lot have. You can too draw additional details with puff glue or glitter glue, or add together a coating of ModPodge or other shiny finish.
- Staple or glue the two edges of the lantern together.
- Decorate the handle, made from the i-inch strip of paper you cut in Pace 1.
- Attach the handle to the lantern.
- Cutting out streamers "" or strips of crepe paper — and glue to the bottom of the lantern.
Peking Opera Masks
Difficulty level: Medium
Did you know that Chinese opera is one of the earliest forms of theater? The first opera school was established in the Tang Dynasty, and from and then, several "schools" or styles emerged in different provinces. The Peking Opera manner is especially known for its elaborate masks. These vivid masks made use of symbolic colors or expressions that helped the audience understand the type of grapheme the actor was playing. For example, the red mask was e'er used by the dauntless hero, the dark-green mask was for rebellious or impulsive characters, and the yellow mask was worn past roughshod, sly, or malicious villains. For this Asian crafts tutorial, you can follow the traditional symbolisms or design i according to your preference!
Materials
- White cardstock
- Poster pigment
- Thick markers
- Scissors
- Hole punch
- Rubber bands or elastic cord
- Optional: colored cardstock and scrapbook foam adhesive
Instructions
- Cut the cardstock into a circle that is slightly bigger than your face. You can use a dinner plate as a guide to go a perfect circle or brand information technology more "realistic" with ears and an elongated chin. Then, mark the space for the eyes and cut them out with a cutter. To make this step fifty-fifty simpler, y'all can notice the Peking Opera Mask template and print it directly to the cardstock.
- Design the mask. Peking Opera masks are characterized by a singled-out nose pattern and a lot of details around the eyes.
- Paint the mask.
- Once the paint is dry out, you can outline the edges of your pattern with a black or gilded marker for a smoother and more defined stop.
- If you want to give a more iii-dimensional expect to your mask, cut out colored cardstock into desired shapes and adhere to the mask with scrapbook foam, then you can create interesting layers.
- Punch holes on the side of the mask and necktie a rubber band or rubberband.
Stone Mandalas
Source: By Lydia May, "How to Paint Dot Mandalas VERY BEGINNERS STONE Handmade rock Footstep by Footstep" (https://www.youtube.com/scout?v=Pejqo_iQhCk)
Difficulty level: Medium
Mandalas are a spiritual Asian fine art and are often used in Buddhism and Hinduism every bit part of meditation and prayer. It is practiced in Japan, India, Tibet, and many other Asian countries. The mandalas have a symmetrical geometric design. They use simple shapes – circles, lines, squares, triangles, swirls and petals – which emanate from the centre. The act of repeating the blueprint, every bit it grows outward and perhaps increases in complication, reflects the procedure of finding your cadre and so being 1 with a greater whole. Many people find mandala making very relaxing, and since it only uses unproblematic shapes you tin create stunning artwork even if you don't have principal cartoon skills.
Materials
- Pigment (such as water-based acrylic or poster paints)
- Brushes with a abrupt tip (different sizes) or dotting tools
- Stones with a flat surface
- Protective coating
Instructions
- Look for the middle of your stone, either by eyeballing information technology or measuring with a ruler.
- Paint a large dot in the eye. Either eyeball it or measure. Offset with a larger dot in the center. You may accept to brand a small circle with your dotting tool.
- Draw smaller dots around the big dot. Utilise a smaller paintbrush or dotting tool, or makeshift dotting tools such as chopsticks or an unused pencil.
- Start alternate dots of different colors or sizes. In that location are no "rules" here – office of the mandala meditation is to listen to yourself and your instincts. Simply go along the symmetry and step back every few minutes to see the whole – you will have an idea of where the pattern is "taking you lot."
- Experiment with other shapes. "Drag" a dot to create a swirl. Or, brand a circle within a circumvolve, or add diamonds or lines.
- One time you have finished the mandala, go out the paint to completely dry before applying a protective coating with a transparent finish.
If you're a beginner, or you're working with a pocket-sized stone or very detailed patterns, let the pigment completely dry before adding the adjacent "layer" to the design. That tin can help preclude smudging. You can besides draw faint lines in an asterisk pattern from the heart to help guide your placement and reach perfect symmetry. This isn't disquisitional – some people adopt a more free-flowing arroyo – just it can help if you're new to mandala painting.
Mucilage Batik Making
 Source: By Showtime Palette, "Gum Batik" (https://www.firstpalette.com/arts and crafts/glue-batik.html)
Difficulty level: Piece of cake
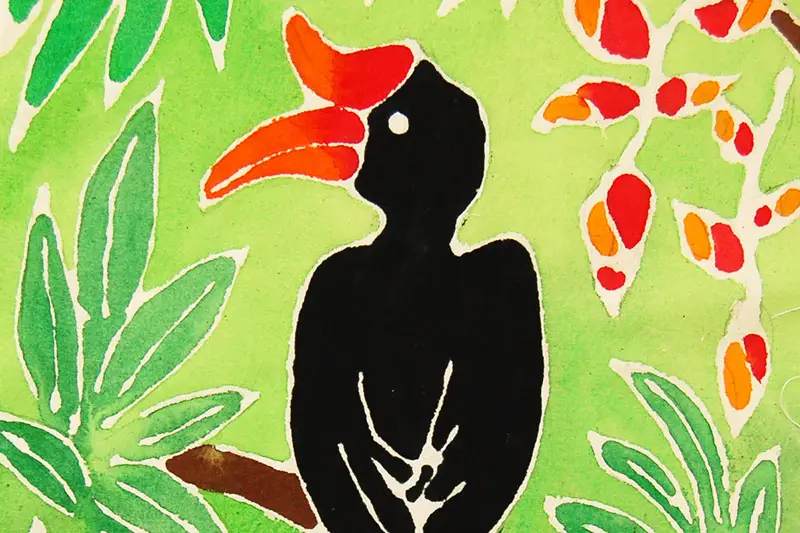
Batik is a traditional Indonesian art of dyeing fabric using wax-resist techniques. They draw beautiful patterns or freehand designs, using melted wax applied with a spouted tool (which they call canting ) or copper stamps. This simplified version borrows from the Batik method, and is piece of cake and safe enough for fifty-fifty kids to practise! Just call up, always piece of work in a well-ventilated room whenever you piece of work with fabric paints, and protect your wearing apparel past wearing an old shirt or an frock.
Materials
- Fabric (either cotton or canvas)
- Fabric paint
- White gum in a squeezable canteen
- Paintbrushes of dissimilar sizes
- Pencil
- Plastic wrap or placemat
Instructions
- Cutting canvas or cotton textile into the size you like. Remember of how y'all desire to use the fabric later on on: a pocket-sized square tin be framed or sewn onto a T-shirt, while larger sheets can later be made into pillowcases, table runners, bags, or other crafts.
- Sketch the pattern with a pencil. Information technology's easier to have a design that has large elements or "blocks" where yous can place colors. This simplified method of Batik making will not work with very small, detailed designs.
- Identify plastic wrap or placemat on your work surface, then put your fabric underneath. This protects the table from any glue or paint that may seep through.
- Squeeze the glue and trace information technology over the outline of your design. Leave it to dry completely (ordinarily effectually v to 6 hours). You know the glue is ready if it is transparent, and if information technology is hard when you lot touch it.
- Ready the paint to the desired consistency. Dilute it more to get a faint, watercolor finish. Add together only a niggling water if you want colors to be very bold (but deport in mind that the thicker the paint, the longer it will take to dry). Practise not use pure pigment, because information technology will flake away when it is dry out.
- Paint your pattern, as desired. You can randomly paint in different colors to create a tie-dye result, or follow your design and use the outlines equally "borders".
- Let the paint dry. You can cheque if the gum has successfully resisted the paint past checking the backside of your fabric "" you should see white spaces where you have applied the glue.
- Pare off the glue. If y'all can't go out everything, soak the cloth in warm water for almost 15 to 30 minutes.
- Once y'all take removed the mucilage, fe information technology to "set up" the paint. Hem the edges of the cloth to prevent it from fraying. Now, you lot can use it whatsoever fashion y'all want!
Tip : always practise a spot-test of fabric paint to come across how well it stays, or how "true to colour" it is to the label. It will help avert the mess and disappointment of finding out subsequently on that your paint looks faded or tends to bleed.
Have a Deeper Dive into Asian Crafts
The more than you lot read about Asian crafts, the more than y'all'll be impressed past their artistry, and enthralled by the history and culture backside them. We hope these projects will inspire y'all to try more than Asian crafts, and even consider learning advanced techniques. There are many video tutorials that can assistance you lot learn the "accurate" process, and thanks to the Internet, you tin can order the materials or even get kits to get you started.
Comments
comments

Arts And Crafts Of Asia,
Source: https://craftwhack.com/asian-crafts/
Posted by: samonsatrom1955.blogspot.com
0 Response to "Arts And Crafts Of Asia"
Post a Comment